
We’re going to walk through setting up a Node.js project that will fetch Instagram posts, filter by a set of hashtags, then upload those images to Cloudinary, and then trigger a Netlify build. This script will run on a schedule through Github Actions.
tl;tr
Here’s the instagram-cloudinary repo if you’d like to skip to the final code.
Update: January 2023 - Shortly after posting this article, I moved my site from Gatsby to Nextjs. You can see how I retrieve the images in the Retrieving Cloudinary Images section.
The Problem
First, a little history…
I’ve been using the gatsby-source-instagram plugin for a while on my site to highlight some of my illustrations. I even added some functionality to the plugin so consumers could query their posts by hashtag.
The plugin author has done a great job tracking down issues and documenting the convoluted steps to get Facebook/Instagram API credentials. The plugin worked great for a while, but due to many changes in the Facebook/Instagram API, it became less reliable and harder to debug.
It got to a point where I couldn’t update my site because of the errors from the Instagram API. I believe that part of the problem is the frequency of querying the API, where it seemed to only work every few minutes, throwing an error in between of “Please try again later.” When working on the site locally, it would cause a cascade of errors in Gatsby’s graph. Because of this and the ever-changing permissions in the Facebook API, the plugin has been much harder to maintain.
To query the Instagram API less frequently and have more control, I decided to set up a Node.js project to fetch posts from the Instagram API, filter and find hashtags, and then upload those to Cloudinary. When the posts send successfully, the script fires a Netlify build via a webhook.
The Goal
To make this work for my case, I jotted down what I needed this script to do.
- fetch the latest posts from Instagram
- make sure we get the first few comments (I used to put the post’s hashtags in the first comment)
- upload the posts that match my hashtag list to Cloudinary
- trigger a build of my site (my site was running gatsby-source-cloudinary, now in pulls in the images with the Cloudinary client)
Setting up a new project
The first thing to do is set up a new Node.js project. There are quite a few starters out there, but, for this, I just started from scratch.
Create the project folder and navigate to it.
mkdir instagram-cloudinarycd instagram-cloudinaryInitialize the package.json. I use yarn, but feel free to use npm.
yarn initThis is what my package.json file looks like after initialization:
{ "name": "instagram-cloudinary", "version": "1.0.0", "main": "src/index.js", "author": "@joelmturner", "license": "MIT", "private": true}I like to use TypeScript so that’s the first dependency I’ll add here. The -D flag sets them as devDependencies. ts-node is going to help run the script.
yarn add -D typescript ts-node @types/nodeNext, it’s time to set up the tsconfig.json file. I usually run the init and update the items as necessary.
yarn tsc --initThis is how mine looks after cleanup.
{ "compilerOptions": { "target": "esnext", "module": "commonjs", "rootDir": "src", "isolatedModules": true, "strict": true, "noImplicitAny": false, "resolveJsonModule": true, "esModuleInterop": true, "lib": ["es2015", "dom"] }}Since we’ll be using API keys for Instagram and Cloudinary, we can add dotenv to help us with the environment variables.
yarn add -D dotenvNext is adding the script file in the src folder.
mkdir srctouch src/index.tsIn this file we can add some pseudo code to help us step through. Our src/index.ts can look like this:
async function instagramToCloudinary() {  // fetch the posts from Instagram  // convert the posts by hashtags  // upload to Cloudinary  // trigger a build if posts are pulled successfully}
// fire the scriptinstagramToCloudinary();
Instagram Query
Let’s get those posts!
We’ll start with adding axios as a dependency. Axios will help us with the requests.
yarn add -D axiosNext, let’s set up some environment variables for Instagram. For this, you’ll need an access token and Instagram id from Facebook so that you can query Instagram. Honestly, I don’t remember how I got these working correctly but, the directions on gatsby-source-instagram were helpful.
Create a .env file at the root of your project and add your values like:
INSTAGRAM_ACCESS_TOKEN=XXXXXXINSTAGRAM_ID=XXXXXXNow that we have these ready, we can start putting the script together. I’ll put the Instagram fetching in its own function, so it’s easier to reason about later.
require("dotenv").config();const MAX_POSTS = 500;
async function fetchInstagramPosts() {  console.log("🚀 fetching Instagram posts");  const response = await axios.get(    `https://graph.facebook.com/v12.0/${process.env.INSTAGRAM_ID}/media?fields=media_url,caption,media_type,timestamp,children{media_url},comments.limit(3){text}&limit=${MAX_POSTS}&access_token=${process.env.INSTAGRAM_ACCESS_TOKEN}`,  );  return response?.data?.data;}
async function instagramToCloudinary() {  // fetch the posts from Instagram  const posts = await fetchInstagramPosts();
  // convert the posts by hashtags  // upload to Cloudinary  // trigger a build if posts are pulled successfully}
// fire the scriptinstagramToCloudinary();
First, we add the require("dotenv").config(); so we have access to the environment variables that we set up above.
For the request, we’re using axios and building the URL with our parameters. The parameters are specialized to what we need for grabbing all the user’s posts and the first three comments on those posts.
We’re using the environment variables declared above to place into these parameters for the id and access token. The MAX_POSTS is a setting that we can increase whenever we need to do more or decrease if we’re only trying to maintain the last few posts posted to Instagram.
We then use an await to make sure the posts resolve before moving on to the next step. We can also add a try-catch in case there is a failure.
async function fetchInstagramPosts() { try { console.log("🚀 fetching Instagram posts"); const response = await axios.get( `https://graph.facebook.com/v12.0/${process.env.INSTAGRAM_ID}/media?fields=media_url,caption,media_type,timestamp,children{media_url},comments.limit(3){text}&limit=${MAX_POSTS}&access_token=${process.env.INSTAGRAM_ACCESS_TOKEN}`, ); return response?.data?.data; } catch (error) { console.log("😿 Instagram fetch error", error); }}Prepare the Posts by Hashtag
Let’s do this section in its own function as well. We can add the invocation of it to instagramToCloudinary(). We’ll add a type of UploadPost that we can define in src/types.ts and import into our script. The UploadPost array will store our data in a way that we can pass to Cloudinary more easily.
import { UploadPost } from "./types";
async function instagramToCloudinary() {  // fetch the posts from Instagram  const posts = await fetchInstagramPosts();
  if (posts?.length) {    // convert the posts by hashtags    const cloudinaryCollection: UploadPost[] =      convertInstagramPostToCloudinaryEntity(posts);
// upload to Cloudinary // trigger a build if posts are pulled successfully }}export type UploadPost = { url: string; public_id: string; folder: string; overwrite: true; tags: string[]; createdDate: number;};Now, let’s create the convertInstagramPostToCloudinaryEntity() function. This one is fairly deep, so I’ll try to walk through it in pieces, then put it all together. We can stub out the function and add a type of Post which is, roughly, the shape we get back from the Instagram API.
import { Post, UploadPost } from "./types";require("dotenv").config();const MAX_POSTS = 500;
async function fetchInstagramPosts() {}
function convertInstagramPostToCloudinaryEntity(posts: Post[]): UploadPost[] {  console.log("🚀 converting posts to Cloudinary");
// check for hashtags in the posts and add to the collection}export type Post = { media_url: string; caption?: string; media_type: "IMAGE" | "VIDEO" | "AUDIO"; timestamp: string; comments_count: number; id: string; comments?: { data: Comment[]; };};Now that we have a function ready to start with, we need to figure out how to filter the posts based on a hashtag. I opted to create a list of the hashtags I would like to showcase on my site. The list has an id and a regex because I messed up the hashtags a few times on Instagram and didn’t want to go back through to fix them.
export const HASHTAG_CONFIG = [ { id: "joelmturner_abcs2017", regex: /#j.+?2017/gi, }, { id: "joelmturner_featured", regex: /#joelmturner_featured/gi, }, { id: "letterclash", regex: /#letterclash/gi, }, { id: "inktober2017", regex: /#ink.+?2017/gi, }, { id: "inktober2018", regex: /#ink.+?2018/gi, }, { id: "inktober2019", regex: /#ink.+?2019/gi, }, { id: "inktober2021", regex: /#ink.+?2021/gi, }, { id: "handletteredabcs_2016", regex: /#handletteredabcs_2016/gi, },];First, we’ll loop over the hashtag config and filter down to the posts that have the hashtags that we want. Then, we’ll be able to combine the hashtags, if a post has more than one and create an entity that will be easier for the upload step. We can store these in a variable outside of the loop that will be returned at the end of the function.
function convertInstagramPostToCloudinaryEntity(posts: Post[]): UploadPost[] {  console.log("🚀 converting posts to Cloudinary");  const cloudinaryCollection: UploadPost[] = [];
  // check for hashtags in the posts and add to collection  HASHTAG_CONFIG.forEach((config) => {    const postGroup = posts?.filter((post) => {      // making sure the post is an image instead of video      if (post.media_type !== "IMAGE") {        return false;      }      // combines the text from the first 3 comments      const comments =        post?.comments?.data?.reduce((acc, comment) => {          acc = `${acc} ${comment?.text}`;          return acc;        }, "") ?? "";
      const content = `${post?.caption} ${comments}`;      // check to see if our regex matches anything in the combined string      return content.match(config.regex);    });
    // loop over the posts and add to stored variable    if (postGroup?.length) {      postGroup.forEach((post) => {        const timestamp = new Date(post.timestamp).valueOf();        // using a date value as id so it's easier to sort by date        const combinedId = `${timestamp}_${post.id}`;        // see if this post is already in our collection        const found = cloudinaryCollection.find(          (uploadPost) => uploadPost.public_id === combinedId,        );
        if (found) {          // combine tags on the entity          found.tags = [...found.tags, config.id];        } else {          // create entity          cloudinaryCollection.push({            url: post.media_url,            public_id: combinedId,            folder: "illustration",            overwrite: true,            tags: [config.id],            createdDate: timestamp,          });        }      });    }  });
  return cloudinaryCollection;}
Upload to Cloudinary
Now that we have an array of Cloudinary-like entities, we’re ready to move on to uploading to Cloudinary. To achieve this, we’ll need to make sure we have upload credentials.
Cloudinary API Credentials
If you’re new to Cloudinary, they have a very generous free tier where you can sign up at cloudinary.com or use this invite link. Once you’re signed in, you can follow the steps below.
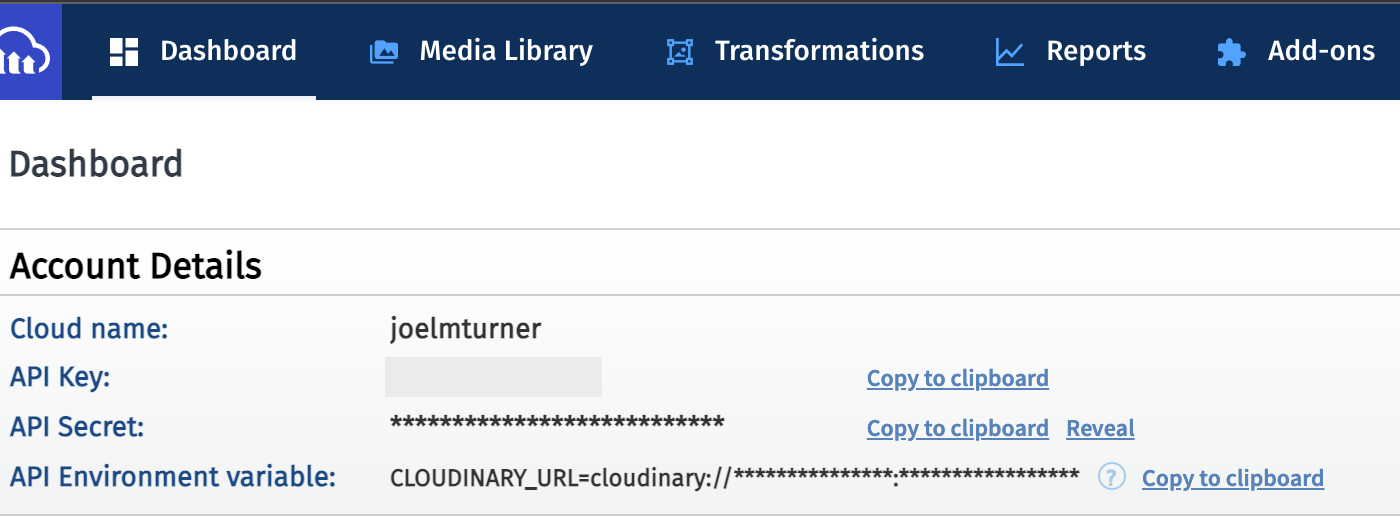
If you have a Cloudinary account, you can log in and go to Settings -> Security -> Access Keys. Here, you can add a new pair, which will be used in this script.
Once finished, you should see all the details you’ll need at the top of your Cloudinary dashboard.
Cloudinary Client
Let’s get the Cloudinary client connected. We’ll need to add some items to our .env file.
# InstagramINSTAGRAM_ACCESS_TOKEN=XXXXXXINSTAGRAM_ID=XXXXXX
# CloudinaryCLOUDINARY_CLOUD_NAME=XXXXXXCLOUDINARY_API_KEY=XXXXXXCLOUDINARY_API_SECRET=XXXXXX
We can now use these in our app to help us connect to Cloudinary. Here is the connection config. I placed this at the top of the index file, under the imports.
cloudinary.v2.config({ cloud_name: process.env.CLOUDINARY_CLOUD_NAME, api_key: process.env.CLOUDINARY_API_KEY, api_secret: process.env.CLOUDINARY_API_SECRET, secure: true,});Start the Uploads
We’re now ready to start the upload process. We’ll start by creating a new async function because we want to know if all of the uploads made it successfully.
import { UploadPost } from "./types";
async function instagramToCloudinary() {  // fetch the posts from Instagram  const posts = await fetchInstagramPosts();
  if (posts?.length) {    // convert the posts by hashtags    const cloudinaryCollection: UploadPost[] =      convertInstagramPostToCloudinaryEntity(posts);
// upload to Cloudinary const uploadStatus = await sendToCloudinary(cloudinaryCollection); // trigger a build if posts are pulled successfully }}async function sendToCloudinary(postGroup: UploadPost[]) { console.log("🚀 uploading to Cloudinary");}Cloudinary doesn’t have a bulk upload script but their individual upload is very quick and can handle many uploads simultaneously so we can just loop over our entities and send them up. Here’s the upload API we’ll be using. There are a lot of options that can be adjusted based on the projects’ needs. Here, we’re just using the basic options.
async function sendToCloudinary(postGroup: UploadPost[]) {  console.log("🚀 uploading to Cloudinary");  const resolves = postGroup.map(    async ({ public_id, folder, overwrite, tags, url }) => {      try {        return new Promise((resolve, reject) => {          cloudinary.v2.uploader.upload(            url,            {              public_id,              folder,              overwrite,              tags,            },            function (error) {              if (error) {                reject(error);              } else {                resolve("SUCCESS");              }            },          );        });      } catch (error_1) {        console.log("😿 Cloudinary upload error", error_1);      }    },  );
  // make sure all were successful  const successfullyResolved = (await Promise.all(resolves)).every(    (resolve) => !!resolve,  );
  return successfullyResolved ? "SUCCESS" : "ERROR";}
I’m using an array of promises to help me determine if any had an error while uploading. This may not be necessary for all cases but I like to know, especially before kicking off a new build of the site.
The last argument in the upload function is a callback that can help us determine if the upload was successful or not. We can check against this in our successfullyResolved check and return an appropriate status.
Trigger Netlify Deploy
If all the images were uploaded successfully, we’ll trigger the build on Netlify. First, we’ll need our Netlify webhook. You can set one up in the deploys settings https://app.netlify.com/sites/<account>/settings/deploys under the Build Hooks section. Once you have the hook, you can add that to your .env file.
# InstagramINSTAGRAM_ACCESS_TOKEN=XXXXXXINSTAGRAM_ID=XXXXXX
# CloudinaryCLOUDINARY_CLOUD_NAME=XXXXXXCLOUDINARY_API_KEY=XXXXXXCLOUDINARY_API_SECRET=XXXXXX
# NetlifyNETLIFY_WEBHOOK=XXXXXX
We’ll now set up a conditional build script using axios.
// trigger a build if posts are pulled successfullyif (uploadStatus === "SUCCESS") { axios .post(process.env.NETLIFY_WEBHOOK as string) .then(() => { console.log("🚀 triggered Netlify build"); }) .catch((error) => { console.log("😿 Netlify trigger error", error); });}Our script should look something like this now:
import axios from "axios";import cloudinary from "cloudinary";import { HASHTAG_CONFIG, MAX_POSTS } from "./constants";import { InstagramResponse, Post, UploadPost } from "./types";require("dotenv").config();
cloudinary.v2.config({  cloud_name: process.env.CLOUDINARY_CLOUD_NAME,  api_key: process.env.CLOUDINARY_API_KEY,  api_secret: process.env.CLOUDINARY_API_SECRET,  secure: true,});
async function sendToCloudinary(postGroup: UploadPost[]) {  console.log("🚀 uploading to Cloudinary");  const resolves = postGroup.map(    async ({ public_id, folder, overwrite, tags, url }) => {      try {        return new Promise((resolve, reject) => {          cloudinary.v2.uploader.upload(            url,            {              public_id,              folder,              overwrite,              tags,            },            function (error) {              if (error) {                reject(error);              } else {                resolve("SUCCESS");              }            },          );        });      } catch (error_1) {        console.log("😿 Cloudinary upload error", error_1);      }    },  );
  // make sure all were successful  const successfullyResolved = (await Promise.all(resolves)).every(    (resolve) => !!resolve,  );
  return successfullyResolved ? "SUCCESS" : "ERROR";}
async function fetchInstagramPosts(postRequestError) {  try {    console.log("🚀 fetching Instagram posts");    const response = await axios.get<InstagramResponse>(      `https://graph.facebook.com/v12.0/${process.env.INSTAGRAM_ID}/media?fields=media_url,caption,media_type,timestamp,username,children{media_url},permalink,comments.limit(3){text}&limit=${MAX_POSTS}&access_token=${process.env.INSTAGRAM_ACCESS_TOKEN}`,    );    return response?.data?.data;  } catch (error) {    postRequestError = error;    console.log("😿 Instagram fetch error", error);  }}
function convertInstagramPostToCloudinaryEntity(posts: Post[]): UploadPost[] {  console.log("🚀 converting posts to Cloudinary");  const cloudinaryCollection: UploadPost[] = [];
  // check for hashtags in the posts and add to collection  HASHTAG_CONFIG.forEach((config) => {    const postGroup = posts?.filter((post) => {      // making sure the post is an image instead of video      if (post.media_type !== "IMAGE") {        return false;      }      // combines the text from the first 3 comments      const comments =        post?.comments?.data?.reduce((acc, comment) => {          acc = `${acc} ${comment?.text}`;          return acc;        }, "") ?? "";
      const content = `${post?.caption} ${comments}`;      // check to see if our regex matches anything in the combined string      return content.match(config.regex);    });
    // loop over the posts and add to stored variable    if (postGroup?.length) {      postGroup.forEach((post) => {        const timestamp = new Date(post.timestamp).valueOf();        // using a date value as id so it's easier to sort by date        const combinedId = `${timestamp}_${post.id}`;        // see if this post is already in our collection        const found = cloudinaryCollection.find(          (uploadPost) => uploadPost.public_id === combinedId,        );
        if (found) {          // combine tags on the entity          found.tags = [...found.tags, config.id];        } else {          // create entity          cloudinaryCollection.push({            url: post.media_url,            public_id: combinedId,            folder: "illustration",            overwrite: true,            tags: [config.id],            createdDate: timestamp,          });        }      });    }  });
  return cloudinaryCollection;}
async function instagramToCloudinary() {  let postRequestError = null;
  // fetch the posts from Instagram  const posts = await fetchInstagramPosts(postRequestError);
  if (posts?.length) {    // convert the posts by hashtags    const cloudinaryCollection: UploadPost[] =      convertInstagramPostToCloudinaryEntity(posts);
    // upload to Cloudinary    const uploadStatus = await sendToCloudinary(cloudinaryCollection);
    // trigger a build if posts are pulled successfully    if (!postRequestError && uploadStatus === "SUCCESS") {      axios        .post(process.env.NETLIFY_WEBHOOK as string)        .then(() => {          console.log("🚀 triggered Netlify build");        })        .catch((error) => {          console.log("😿 Netlify trigger error", error);        });    }  }
  // for local debugging  //   fs.writeFile("test.json", JSON.stringify(cloudinaryCollection, null, 2), (err: any) => {  //     if (err) {  //       console.error(err);  //       return;  //     }  //     //file written successfully  //   });}
// fire the scriptinstagramToCloudinary();
Github Action to Run on Schedule
In your Github project you can create an action and use the following config for a daily run.
# This is a basic workflow to help you get started with Actions
name: Post Fetch and Deploy
# Controls when the workflow will runon:  schedule:    - cron: "0 0 * * *"
  # Allows you to run this workflow manually from the Actions tab  workflow_dispatch:
# A workflow run is made up of one or more jobs that can run sequentially or in paralleljobs:  # This workflow contains a single job called "build"  build:    # The type of runner that the job will run on    runs-on: ubuntu-latest
    strategy:      matrix:        node-version: [14.17.x]
    # Steps represent a sequence of tasks that will be executed as part of the job    steps:      # Checks-out your repository under $GITHUB_WORKSPACE, so your job can access it      - uses: actions/checkout@v2
      - name: Using Node version ${{ matrix.node-version }}        uses: actions/setup-node@v1        with:          node-version: ${{ matrix.node-version }}      - name: create env file        run: |          MY_STRING=$(cat << EOF          INSTAGRAM_ACCESS_TOKEN =${{secrets.INSTAGRAM_ACCESS_TOKEN}}          INSTAGRAM_ID =${{secrets.INSTAGRAM_ID}}          CLOUDINARY_CLOUD_NAME =${{secrets.CLOUDINARY_CLOUD_NAME}}          CLOUDINARY_API_KEY =${{secrets.CLOUDINARY_API_KEY}}          CLOUDINARY_API_SECRET =${{secrets.CLOUDINARY_API_SECRET}}          NETLIFY_WEBHOOK =${{secrets.NETLIFY_WEBHOOK}}          EOF          )          touch .env          echo "$MY_STRING" >> .env      - run: yarn      - run: yarn start
The - cron: "0 0 * * *" is what configures the action to run once a day.
Retrieving Cloudinary Images
I use the Cloudinary api to retrieve the images for my site. Here is search that I’m using:
cloudinary.v2.config({  cloud_name: process.env.NEXT_PUBLIC_CLOUDINARY_CLOUD_NAME,  api_key: process.env.CLOUDINARY_API_KEY,  api_secret: process.env.CLOUDINARY_API_SECRET,  secure: true,});
...
await cloudinary.v2.search    .expression('folder:illustration')    .sort_by('public_id', 'desc')    .max_results(300)    .with_field('tags')    .execute()
This searches my images in the illustration folder, sorts by alphabetical descending and makes sure the tags come along as well.
Conclusion
Offloading my Instagram posts to Cloudinary has made my site build more reliably, especially when I’m doing local development. The Cloudinary API has been rock solid for me so far and it’s easier to work with.
Hopefully, this process is broken up enough that any service could be swapped out for another with little effort. I can see other social channels being aggregated into this pipeline as well.